Your baby is here and you want to carry him or her close to you in a sling. Tying a sling with a baby is too complicated for you? It’s easier with the elastic manduca sling in the pre-tied version. You can use it to pre-tie the sling without your baby and then put your baby in it when you are finished and happy with everything. Tip: tightening the edges of the sling is an important point! Please always check in front of the mirror when you do your last check:
- M-position (Is your baby sitting in the squat-spread position?)
- Are the airways clear? (Always place two fingers of air under baby’s chin. Baby’s chin must not sink onto his chest).
- Is your baby positioned at head-kissing height?
- Do you have your baby in sight?
- Is the baby’s back round and well supported? (means in plain language: is the sling tied tightly enough?)
Step by step manduca sling instructions - pre-tied version
- Centre marking: The manduca logo patch on the manduca Sling
- Cloth strand: gathered cloth web
- Cloth end: the tips of the cloth web
- Cloth edge: the outer edges of the cloth provided with a decorative seam
- Contrast stitching: colour-contrasting stitching on the edge of the fabric (serves as orientation)
Pre-tie - manduca sling instructions
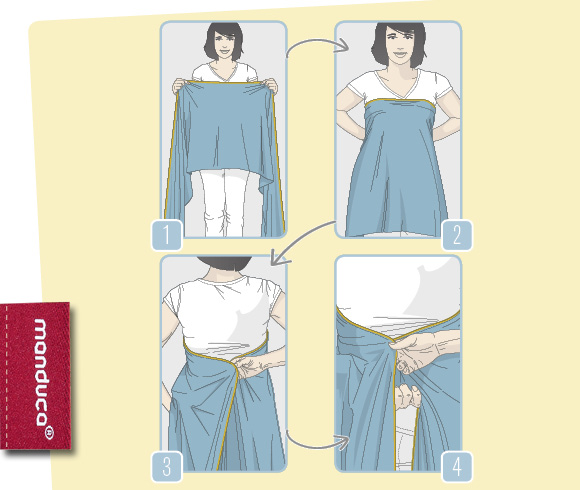
Stand in front of a mirror and hold the sling in both hands. Spread out the sling with the contrasting seam at the top in front of your upper body – the centre mark (manduca logo) should be in the middle (visible in the mirror), and the ends of the sling hang down to the floor in front of you.
Bring the sling panels behind your back and cross them there (change hands). [Images 1-4]
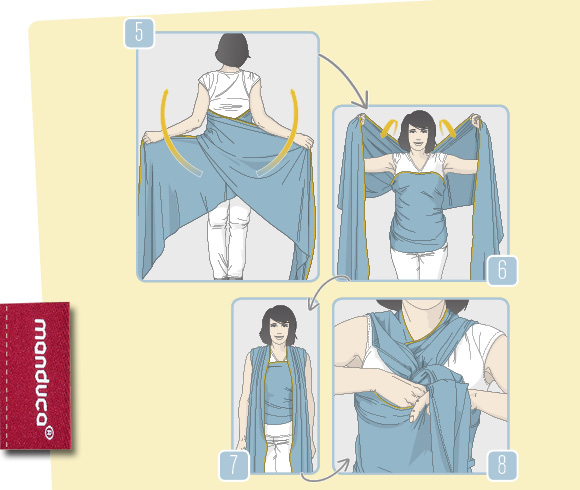
Keep the edges in your hands and take your arms upwards – make “the butterfly” and pull the upper edges tight with both hands. You now have a cross of cloth on your back. Then bring the two lengths of cloth over your shoulders to the right and left. There you take both strands of cloth in front of you in the middle and put them through the cross (the ends of the cloth hang down). [Images 5-8]
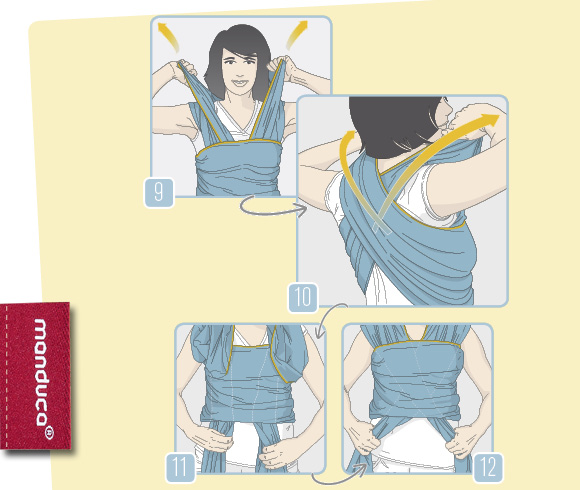
Then tighten the edges of the fabric with the contrast stitching: starting at the back, pull the edges along your shoulders to the front/bottom. Cross the stitched-through fabric strands under the cross band. [Images 9-12]
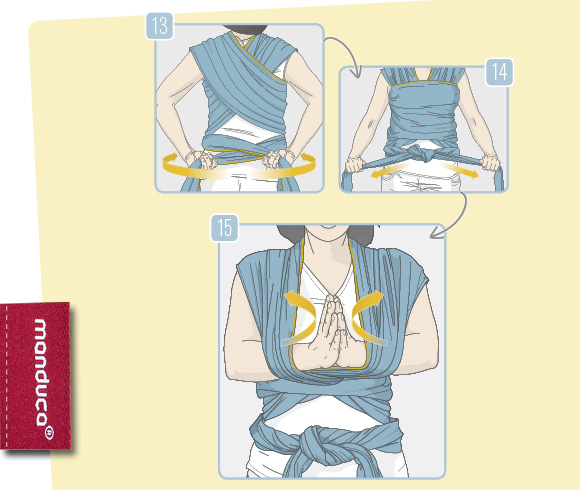
Guide the ends of the cloth to the right and left behind your body and back to the front in front of your belly. You can knot them here. The base is now ready!
Now reach with both hands from the right and left outside through the shoulder strands until your hands meet in the middle. Put your hands together in front of your body (OHMMM! :-)) and use your forearms to bend out the strands of cloth so that there is room for your baby. The crosswise sheet slides down, rolled up. [Images 13-15]
Now your baby comes into play
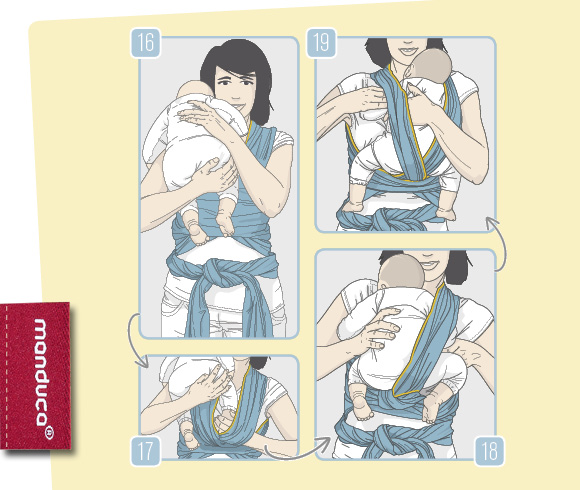
Take your baby up to you – in the middle in front of your chest and pass one leg through each strand of cloth so that it is positioned in the cloth cross. Always hold your baby with at least one hand! [Images 16-19]
First spread out the lower sheet over the baby’s bottom and back and pull it tight: To do this, take hold of the lower sheet behind your baby’s knee and pull it tight. Then spread out the cloth over it (fanning it out in both directions). [Images 20-23]

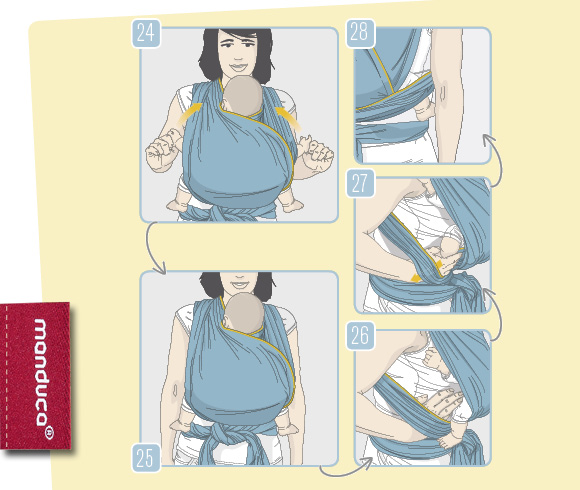
Now take care of the legs that are still lying on the right and left side above the rolled up cross band. Reach from the back underneath through this crossbar and get the leg behind/underneath the cloth bar. [Images 24-28]
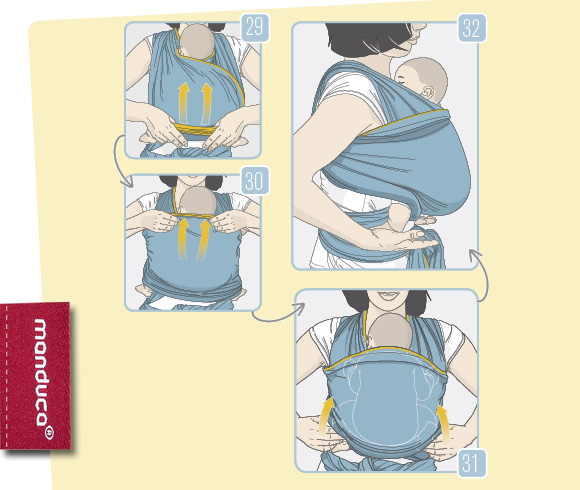
When both legs are behind the crosswise line, you can fan this crosswise line upwards over your child’s back. The bottom edge stays down! The upper edge (the one with the contrast stitching) now becomes the head edge. Finished! [Images 29-31]
Now check the good M-position, free airway, supported back, and head kiss height.
You can find the download instructions on the manduca website.

