You already know the pre-tied carrying method for the elastic sling. You have already carried your newborn baby in the manduca sling. Now your child is bigger, wants to see more and you want even more arm room? Then you should try the manduca Sling hip carrier with the triple twist. You’ll see: with the manduca sling and our manduca sling hip carrier instructions, carrying on the hip is not complicated at all.
Step by step guide: manduca Sling
As with the pre-tied version, you will need: your baby, your baby sling, a mirror and your printed instructions so you can look at the pictures. We have listed some basic terms at the end of the article.
Carrying on the left hip - first steps without baby
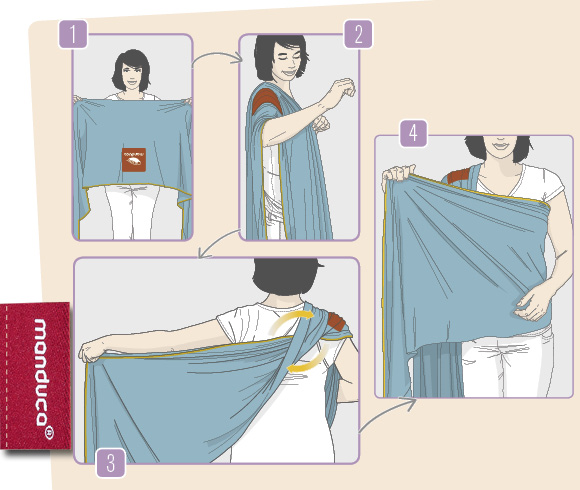
Stand in front of the mirror and take the sling in both hands. Spread the sling out with the contrasting coloured stitching at the bottom in front of your torso – the centre mark (the manduca logo) should now be at the bottom centre and upside down (visible in the mirror), and the ends of the sling hanging down to the floor in front of you.
If you want to wear on your left hip, place the sling over your right shoulder so that the manduca logo is visible on your shoulder. The contrasting seam is in the crook of your arm. Now comes the first twist: you twist the sling on your back exactly once, so that you then hold a strip of sling with the contrasting seam on top with your left hand (twist no. 1).
Bring this strip of cloth over your left side to the front, where your right hand takes over and spreads the strip of cloth in front of your upper body. Now you have a cross panel in front of you with a contrast seam at the top, which crosses the panel hanging down on the right side. [Images 1-4]

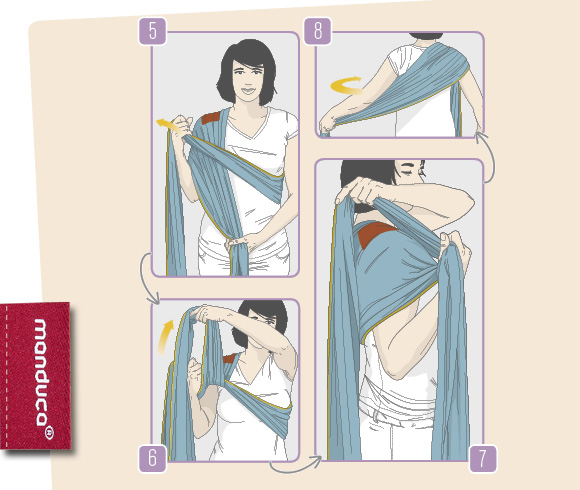
Now gather both lengths of cloth together with one hand so that you have two strands of cloth (one horizontal and one vertical). With your right hand, pull the horizontal strip of cloth to the right and hold it. Then fold the hanging cloth strand around the horizontal cloth strand upwards over your right shoulder to the back and bring it back to the front over your left side. [Images 5-8]
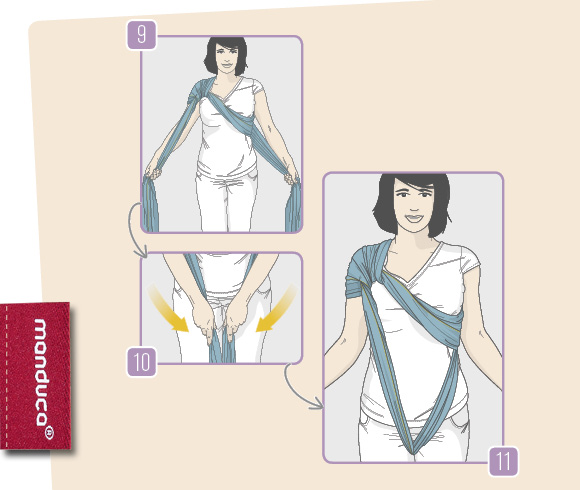
Intermediate result (photo 9): The right shoulder is completely “under fabric”, from there the other cloth goes diagonally in front of your upper body to your waist. Now clamp both ends of the cloth between your knees. [Images 9-11]
Now your baby comes into play
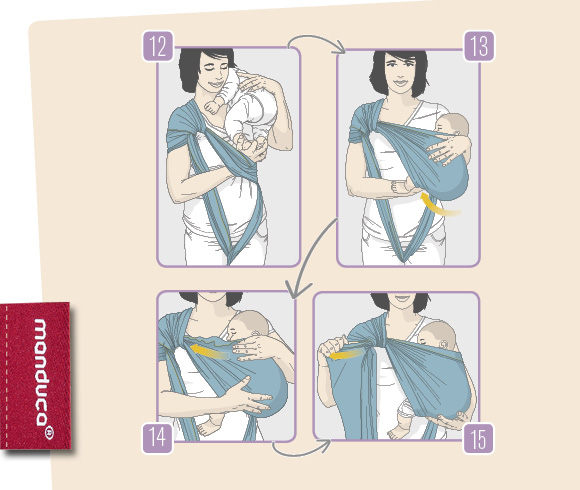
Put your baby on your left shoulder and let it slide its bottom into the diagonal cloth. Pull the fabric under the baby’s bottom between his legs and up so that your baby is “bagged”. Pull the head edge (with contrast stitching) tight. The cloth strands are still stuck between the knees. [Pictures 12-15]
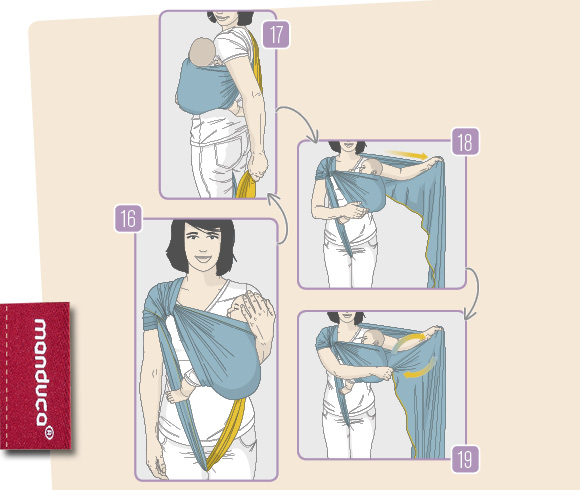
Then take hold of the left hand cloth strand with your left hand and tighten it behind your back (picture 17), then tighten the edge by pulling the cloth sideways (picture 18). When everything is taut, take this strip of cloth on your left side in both hands and twist it once (twist no. 2) so that you then have a cross of cloth on your back and the contrast seam is at the top. [Images 16-19]
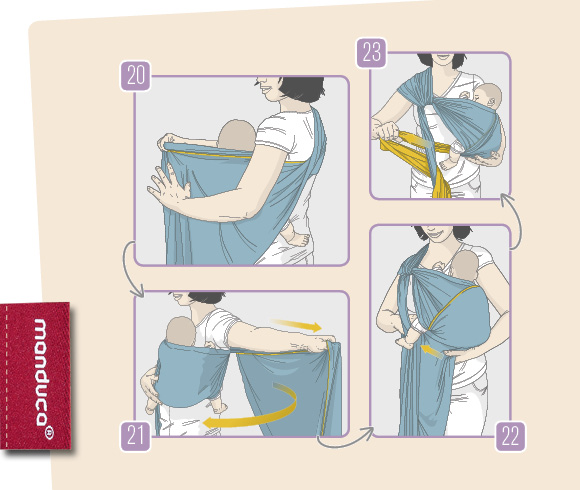
Tighten the top edge with the contrast stitching, then bring the spread cloth forward and over your baby’s back and tuck the cloth under the baby’s bottom. Gather the shawl and bring the shawl strand under the baby’s knee and behind the right vertical shawl strand to the back. [Images 20-23]
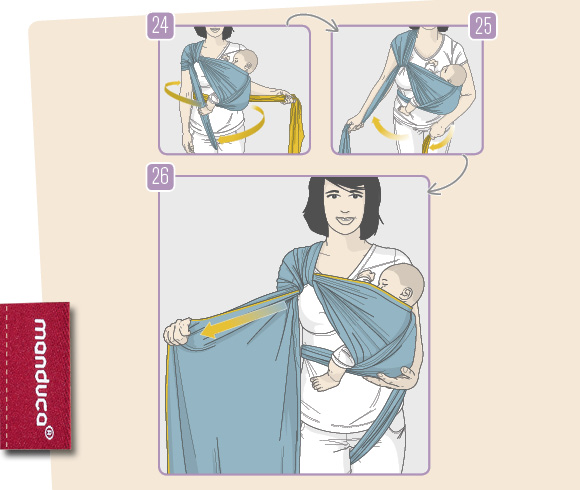
Bring this cloth strand once around your waist back to the front, where you rest it between your knees again. Take the other strand of cloth from there and tighten the edges once more – once to the side away from you and then again downwards. [Images 24-27]
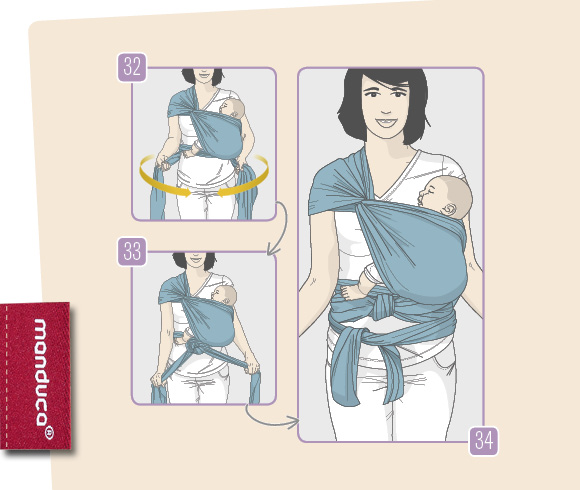
When it is really tight, take the cloth in both hands and twist them against each other again (twist no. 3). Now pull this length of cloth (now with the contrast seam facing down) over the baby’s back and bottom. And tighten the edges! Gather the cloth and bring it back under the baby’s knee. [Images 28-31]

Finally, take both ends of the scarf to the front and knot them. If the ends of the sling are too long, you can loop them around your waist and tie another knot.
The hip carrier with manduca sling is ready! So comfortable and so wonderfully practical. And above all: it’s a thousand times better for you and your back than carrying your baby around on your hip without a carrier. Have fun carrying your baby!
Technical terms
- Centre marking: The manduca logo patch on the manduca Sling
- Cloth strand: gathered cloth web
- Cloth end: the tips of the cloth web
- Cloth edge: the outer edges of the cloth provided with a decorative seam
- Contrast stitching: colour-contrasting stitching on the edge of the fabric (serves as orientation)

